

How to Add Sunflare in Lightroom - A Step-by-Step Guide
Have you ever seen a stunning photo with that dreamy, warm sun flare and thought, “How did they do that?” Well, you’re in luck! This blog post will take you on a journey through the world of sunflare photography and show you how to create those captivating effects in your own images using Adobe Lightroom. Get ready to learn how to add sunflare in Lightroom and make your photos stand out!
Key Takeaways
-
Master sunflare techniques in Lightroom and create stunning images with natural light, lens flares & sun rays!
-
Utilize Radial Filters to enhance certain parts of an image or add a soft focus effect.
-
Experiment with various lightroom presets for a realistic, warm touch that blends seamlessly into your photos - but don’t over edit!
Mastering Sunflare Techniques in Lightroom

Sunflares, also known as lens flares or light flares, are created by the reflection of the sun or light source across the multiple elements of glass inside a lens. They can transform your photos and give them trendy and spectacular effects, adding a warm and inviting atmosphere to your images. Adobe Lightroom offers a variety of tools to help you add these exciting effects, from understanding natural light to utilizing radial filters.
Before introducing sun flare to your image, take into account the light’s direction and choose an appropriate Lightroom preset for the desired outcome. Similarly, while employing the Radial Filter Tool in Lightroom, keeping the light direction of the original image in mind is vital for obtaining a sunflare effect that appears natural.
We will delve into diverse sunflare techniques in this segment, which encompasses working with natural light, applying lens flares and sun rays, and utilizing radial filters.
Understanding Natural Light
Natural light in photography refers to the use of sunlight as the primary light source, and it can vary depending on the time of day, camera direction, and weather conditions. Sunflares can add a beautiful warmth and depth to an image, giving it a more organic feel and making it even more captivating.
Creating stunning sunflares heavily relies on working with natural light as it captures the true essence of the light source. By adjusting the camera direction and settings, and using the right techniques, you can add sun flare to your photos, making them stand out with the beauty of natural light.
Awareness of the light’s direction and the sun’s position is crucial for achieving a realistic and captivating sunflare effect.
Lens Flares and Sun Rays
Lens flares are created by the reflection of the sun or light source across the multiple elements of glass inside a lens, while sun rays are the actual beams of light that come from the sun. Both lens flares and sun rays can enhance your images, adding warmth, depth, and visual interest to your photos.
Light reflecting off the lens surface and/or its parts can cause a ghosting sun flare. This type of phenomenon creates a series of images that progress into the picture. The lens hood assists with preventing unwanted contrast and glare by allowing light to bounce around the elements of the lens. This subsequently creates multiple images instead of capturing a single ray. The number of lens elements, the focal length, and whether or not the lens has an anti-glare coating can all contribute to ghosting.
Grasping the differences between lens flares and sun rays is instrumental in selecting the correct technique for incorporating sunflare effects into your images.
Utilizing Radial Filters
Radial filters in Lightroom are an incredibly powerful tool that allows you to apply selective adjustments to specific areas of a photograph in a circular or oval shape. You can use radial filters to:
-
Enhance certain parts of an image
-
Create vignette effects
-
Draw attention to a subject
-
Add a soft focus effect
-
Adjust exposure, contrast, and saturation
When it comes to sunflare photography, radial filters play a key role in crafting realistic sunflares in Lightroom.
To set up the radial filter in Lightroom, follow these steps:
-
Open the radial filter panel.
-
Select the shape you want to use - a circle, oval, or polygon shape.
-
Adjust the size and position of the filter to fit the area you want to adjust.

After the radial filter is set up, tweaking the feathering and opacity can help generate a realistic sunflare effect. You can also adjust the highlights, shadows, and midtones to further refine the effect and create a beautiful sunflare that enhances your image.
Creating Sunflares with Presets
An alternative way to create sunflares in Lightroom is by using presets. Lightroom presets can dramatically save time and increase color and contrast in images. Using sun rays and lens flare presets, you can choose from a variety of effects that can be easily applied to your images. Presets can be customized and adjusted to achieve the desired sunflare effect, making it easy to add that warm, inviting touch to your photos.
In this segment, we will delve into the process of crafting sunflares using presets in Lightroom. This entails:
-
Selecting the appropriate preset from a collection or creating a sun flare preset yourself
-
Tailoring the preset to complement your image and achieve the desired sun rays and lens flare effects.
-
Enhancing your photos with the warmth and depth that sunflares provide.
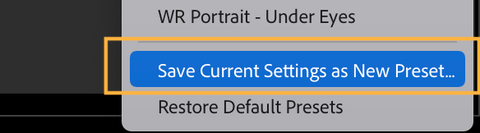
Saving your own sun flare presets is really easy. Click on the Presets drop down menue in the masks tab and then scroll all the way down.

Now click "Save Current Settings as New Preset", give your Sunflare Preset a name and click Save. And thats it, now you have your own preset and can reuse it whenever you need it.
Choosing the Right Preset
While selecting a sunflare preset, it’s important to keep the desired effect in mind. Different presets will create different effects, so it’s exciting to experiment with various presets to find the one that best suits your needs.
Presets make editing images with existing sunlight much easier. It’s worth bearing this in mind when using them. This ensures that the sunflare effect looks natural and blends seamlessly with the original image. When using presets, consider the scene, lighting, and time of day to make sure the preset you choose matches the desired look and feel of your photo.
Customizing Presets
After settling on the appropriate preset, it can be customized to generate the ideal sunflare effect for your image. By adjusting the settings in the Basic, Tone Curve, HSL/Color, and Effects panels, you can modify the preset to your liking. You can also update the preset with your customizations by right-clicking on the applied preset and selecting ‘Update with Current Settings’.
Don’t be afraid to get creative with your sunflare presets! By adjusting the radial brushes or leaving them as they are, you can achieve a wide range of effects that will make your photos stand out.
Remember, the more you experiment with presets and customizations, the more you’ll learn about what works best for your images.
Step-by-Step Sunflare Tutorial
Having gained knowledge on sunflare techniques and the use of presets, we can now proceed to a comprehensive tutorial on fabricating sunflares in Lightroom. This tutorial will guide you through the process of setting up the radial filter, positioning and blending the sunflare, and making final touches to your sunflare-enhanced image. By following this quick tutorial, you’ll be able to create stunning sunflares in your photos with ease.
Hence, let’s embark on this fascinating endeavor of fabricating sunflares in Lightroom! Follow these steps and watch your images transform with the added warmth and depth that sunflares provide.
Setting Up the Radial Filter
First, you’ll need to access the Radial Filter tool in Lightroom. To do this, press Shift + + +. M or select the circle icon in the toolbox. Once you have the Radial Filter tool open, you can adjust the size and feather of the filter using the sliders in the Masks panel. This will help you create a circular area of light that you can customize to create the perfect sunflare effect.
Next, apply the edits to the selected area using the Radial Filter by adjusting the sliders in the Masks panel. This will help you control the intensity, color, and shape of the sunflare, allowing you to create a realistic and captivating effect in your image.

Naturally, strong sunlight reduces contrast. Recreate that effect by reducing clarity.
Positioning and Blending the Sunflare
To position and blend the sunflare, first, look for the direction of the light by observing the shadows in the photo. The sun is usually located in the direction of the shadows, so use the click-and-drag technique to move the sunflare to the desired area of the photo. This will help create a more natural effect, as the sunflare will be positioned close to the spot where the sun is located.
Next, adjust the size and shape of the sunflare using the sliders in the Radial Filter panel. This will help you create the desired sunflare effect, allowing you to control the brightness and intensity of the sunflare. Experiment with different sizes and shapes to get the perfect look for your image.
Final Touches and Saving Your Work
Once you’ve positioned and blended the sunflare, it’s time to make some final touches to your image. Adjust the color and contrast of the sunflare to make it look even more amazing. You can also add a vignette effect to really enhance the sunflare and make it stand out.
When you’re satisfied with the sunflare effect in your image, save your work in the desired format. Congratulations! You’ve now created a stunning sunflare-enhanced image using Lightroom. Your photos will surely stand out with the added warmth and depth that sunflares provide.
Enhancing Photos with Additional Light Effects
Beyond sunflares, several other light effects can be applied to your photos, enhancing their allure. Bokeh, light halos, and warmth and color adjustments can all be used to enhance your images, creating a more dynamic and visually appealing result. It’s essential to maintain a natural look while using these effects to avoid over-editing your photos.
In this segment, we will delve into the process of incorporating these additional light effects into your images and underscore the need for preserving the original image’s integrity through natural edits, as well as other edits that enhance the overall visual appeal.
Bokeh and Light Halos
Bokeh and light halos are two captivating light effects that can be added to your images to create a dreamy, ethereal atmosphere. Bokeh signifies the soft, blurred background that emerges when an image is captured with a shallow depth of field.
Light halos, on the other hand, are bright halos around the subject of an image that can be created using presets such as the Compound Halo+Sunrays Preset. Both bokeh and light halos can enhance the natural backlight in your images and provide gorgeous framing around the subject. The colors in the halo will also perfectly complement the color of the grass or other elements in the image, making it even more visually appealing.
Warmth and Color Adjustments
Adjusting the warmth and color of your images can significantly impact the overall look and feel of your photos. To adjust warmth in Lightroom, you can use the Temperature slider in the Develop module. Moving the slider to the right will add warmth to the image, while moving it to the left will make it cooler.
You can also adjust the Tint, Vibrance, and Saturation in Lightroom to further enhance the colors in your images. These adjustments can help you create a more harmonious color palette in your photos, complementing the sunflares and other light effects you’ve added.
But Beware: Keep it Natural and Don't Over Edit Your Photos
Though sunflares and other light effects can significantly augment your photos, it’s paramount to refrain from excessive editing of your images. Over-editing can make photos seem overly processed and fake, create color distractions, and negatively impact mental health and body image.
To keep your edits natural, focus on making small adjustments to enhance the photo without making it look overly processed. It’s important to take breaks and look at the photo objectively. If the photo looks overly processed, take a step back and make adjustments to bring it back to a more natural look. Remember, less is more when it comes to editing photos.
Real-Life Examples and Inspiration
Sunflare photography can be used to enhance various types of photography, such as wedding, portrait, and landscape photography. By adding sunflares to your images, you create a more dramatic and captivating look that can elevate your photography skills.
In this segment, we will delve into real-world instances of sunflares across varied photography types, serving as inspiration for incorporating sunflares in your own work. From beautiful sunflare shots captured using tips for beginners to stunning images created using sun flares and starbursts, there are countless examples of sunflare photography that can inspire you to experiment with this exciting technique in your own images.
Wedding Photography
Sunflares can add a magical touch to wedding photos by adding warmth and depth, creating a sense of intimacy and romance. Incorporating sunflares into your wedding photography can help capture the emotion and atmosphere of the special day, making your images even more memorable and unique.
Browse through wedding photography portfolios or search for sunflare wedding photos online, and you’ll find countless examples of how sunflares can enhance these once-in-a-lifetime images. Use these examples as inspiration to experiment with sunflares in your own wedding photography, adding that extra touch of warmth and depth to your images.
Portrait Photography
Sunflares can also make portrait photography more dynamic and interesting by adding an element of depth and atmosphere to the images. By incorporating sunflares into your portrait photography, you can create captivating images that stand out and showcase the personality of your subject.
Real-life examples of sunflare portrait photography can be found in professional portfolios, photography blogs, and social media platforms. Use these examples as inspiration to experiment with sunflares in your own portrait photography, adding a sense of depth and atmosphere that will make your images even more captivating.
Landscape Photography
Landscape photography can also benefit from the addition of sunflares, as they create a sense of depth and atmosphere that can make your images more visually appealing. Sunflares can help to highlight the natural beauty of a landscape, drawing attention to specific areas of the image and creating a more dynamic and engaging composition.
There are many stunning examples of sunflare landscape photography available online, showcasing the dramatic impact that sunflares can have on a landscape image. Use these examples as inspiration to experiment with sunflares in your own landscape photography, adding depth and atmosphere to your images and making them even more captivating.
Summary
In conclusion, sunflares are a powerful and captivating tool that can dramatically enhance your photography. By mastering sunflare techniques in Lightroom, using presets, and following our step-by-step tutorial, you’ll be able to create stunning sunflare-enhanced images that stand out from the rest. Remember to keep your edits natural, experiment with additional light effects, and draw inspiration from real-life examples to elevate your photography skills. Now go out there and capture some breathtaking sunflare photos, and let your creativity shine!
Frequently Asked Questions
How do I add a Sunflare in Lightroom Classic?
To add a Sunflare in Lightroom Classic, double click where it says effect to reset all of the sliders, then set the temperature slider to 100 and the exposure slider to 0.5.
Finally, select one of the signature edits presets and click number. Exciting!
How do I fix Sunflare in Lightroom?
Adjust the Dehaze slider in Lightroom’s Development Module and use the Lightroom radial filter to remove lens flare quickly and easily!
How do you capture Sunflare?
Capture sun flare by shooting during golden hour and removing the lens hood, then adjust your aperture for different effects. Block the sun with your subject for more creative images and make sure your subject is backlit.
Experiment with position for a phone camera, and shoot late in the day for warm sunflares and earlier in the day for cooler sunflares.
What is the purpose of adding sun flare to a photo?
Adding sun flare to a photo brings a captivating and vibrant feel, transforming an ordinary image into a stunning shot.
Sun flare can be added to any photo, regardless of the subject or the lighting conditions. It can be used to create a dramatic effect, or to add a subtle hint of warmth and brightness.
What are the benefits of using Lightroom presets for sun flare effects?
Lightroom presets are a great way to save time and bring out the beauty of sun flare effects in your photos with ease - perfect for taking your images to the next level!
Using presets can help you quickly apply the same look to multiple images, allowing you to create a consistent style for your portfolio. They can also be used to experiment with different looks and effects, giving you the freedom to explore and find the perfect look for your photos.